Medical Disclaimer: This guide is for informational purposes only and aligns with EPA guidelines. It does not replace professional lab testing. If you suspect lead poisoning, contact a medical professional immediately.
WARNING: Do Not Dry-Sand Lead Paint. Before testing, understand that dry scraping or sanding lead paint creates toxic dust that can linger in your HVAC system and lungs. Always use wet methods when disturbing paint samples.
If your home was built before 1978, the EPA assumes it contains lead-based paint. While professional inspection is the gold standard, EPA-recognized DIY kits can provide immediate answers if used correctly. This guide breaks down the steps to safely test your drywall and trim without contaminating your home
Children are uniquely vulnerable because their bodies absorb 4-5 times as much lead as adults. The Centers for Disease Control (CDC) has set the Blood Lead Reference Value (BLRV) at 3.5 micrograms per deciliter (µg/dL) to identify children with dangerous lead levels. Even low levels of exposure have been linked to damage to the brain and nervous system, slowed growth and development, and learning and behavior problems.
If you are planning to sell or lease your home, federal law under Title X (The Residential Lead-Based Paint Hazard Reduction Act) requires you to disclose any known information on lead-based paint hazards before the sale or lease is finalized.

When Did They Stop Using It?
The 1978 Cutoff Rule The Federal Government banned consumer lead-based paint in 1978.
- Built before 1940: 87% chance of containing lead.
- Built 1940–1959: 69% chance.
- Built 1960–1977: 24% chance.
While industrial use continues (bridges, ships), your primary concern is residential layers. If you are renovating a pre-1978 home, you are legally required to follow EPA RRP (Renovation, Repair, and Painting) safety rules. Failure to comply with these federal regulations can result in civil penalties of up to $37,500 per violation, per day.
Only a few countries worldwide have completely regulated the use for both residential and industrial purposes.
Can I Test It Myself?
Note: As of late 2023, 3M LeadCheck kits have been discontinued. The EPA currently recognizes the D-Lead® paint test kit for consumer use.
Critical Prerequisites: Safety Gear & Isolation.
- Keep everyone, especially children and pregnant women, away from your home, if you suspect that lead dust is present
- Make sure you are well covered up by wearing rubber gloves, face mask with a HEPA filter, lab goggles, and other protective gear
- Test in an inconspicuous area, such as inside a closet or cabinet, corners, or any location that is left undisturbed
Never dry-scrape paint into a pile to test it. This releases invisible lead dust. If a kit requires a chip sample, wet the area with a spray bottle of water before cutting the chip loose to trap the dust.
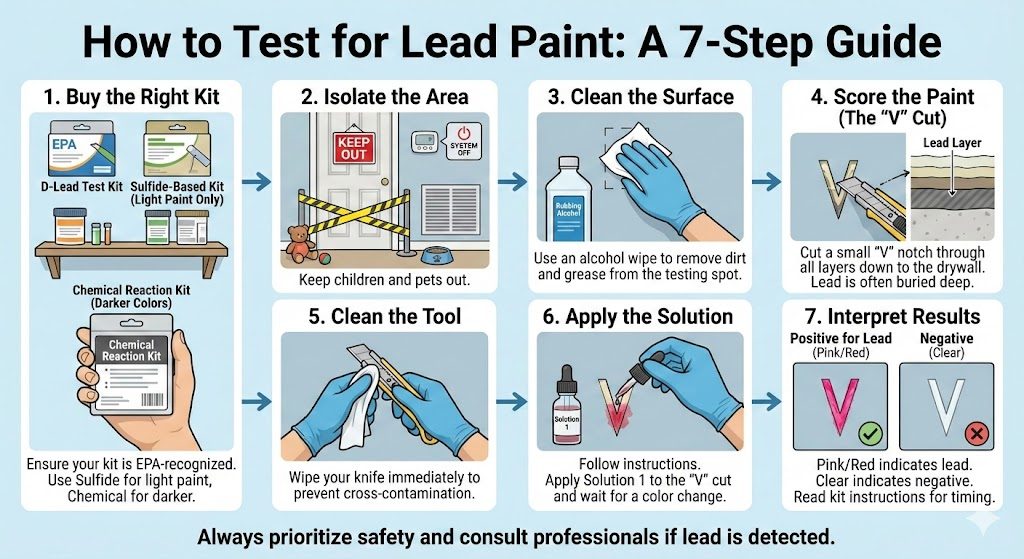
1. Buy the Right Kit: Ensure your kit is EPA-recognized (e.g., D-Lead). Sulfide-based kits work on light paint; chemical reaction kits are needed for darker colors. 2. Isolate the Area: Keep children and pets out of the room. Turn off HVAC systems to prevent dust spread. 3. Clean the Surface: Use a heavy-duty disposable wet wipe or a paper towel dampened with a TSP (trisodium phosphate) solution, or at the least an alcohol wipe. Wipe the testing area in a single downward motion. Do not scrub back and forth, as this agitates surface dust. 4. Score the Paint (The “V” Cut): Use a clean utility knife to cut a small “V” notch through all layers of paint down to the drywall or wood. However, first tape a small plastic “catch-pocket” (a heavy-duty freezer bag works well) directly beneath the test site using painter’s tape. Lead is often buried in the bottom layers. 5. Clean the Tool: Wipe your knife immediately to prevent cross-contamination. 6. Apply the Solution: Follow the kit instructions. Usually, you apply Solution 1 to the “V” cut, waiting for a color change, depending on the kit you’re using.

7. Interpret Results:
Do not rely on guesswork; the chemical indicator depends entirely on the type of kit you purchased. A positive result often happens instantly, but low levels of lead may take several minutes to develop a visible reaction.
| Kit Chemical Type | Reaction Color | Best Use Case | Critical Warning |
| Rhodizonate (e.g., D-Lead, 3M) | Pink or Red | All colors except red/pink. | False Positives: Do not use on red paint; the chemical cannot distinguish between lead and red pigment. |
| Sulfide (Generic swabs) | Black, Grey, or Brown | Light-colored paint only. | Visibility Issues: The reaction is often invisible on dark green, blue, or black paint. |
Pro Tip: If you see no color change, confirm the test liquid is still active. Use the “test confirmation card” included in most EPA-recognized kits (a small dot of lead included in the package). If the swab doesn’t turn pink/black on the control card, the kit is defective or expired—do not trust the negative result on your wall.
8. Seal the Spot: Once finished, cover the test spot with duct tape or new paint to seal any potential lead dust.
Note: Scitus is popular for home information, only D-Lead (and formerly 3M) are recognized for EPA RRP legal compliance.
It is also vital that you check their expiration dates before testing, and strictly follow the instructions given. Using expired testing kits or skipping important steps when testing will compromise the results.
In my years managing a lead paint test kit webstore, the most frequent complaint I received wasn’t that the kits were broken—it was that users were getting “False Negatives” on homes I knew were high-risk.
I remember one customer, a father renovating a 1920s nursery, who swore his walls were lead-free because his test swab stayed clear. When I asked him to describe his process, he said he swabbed the “clean, white surface” of the wall. That was the mistake.
He was testing a layer of latex paint from 2015, not the lead paint from 1920 buried four layers deep. Once I instructed him to cut a deep “V” notch down to the plaster, the very same kit turned bright pink instantly. If he had trusted that surface test, he would have dry-sanded lead dust directly into his nursery. Always cut deep—lead hides in history, not on the surface.
Consider buying several tests if you plan to check multiple sections of your home. Each kit normally contains enough materials for a maximum of six tests. One kit may not be enough to cover all the structures or objects you want to test. Make sure that the kit you buy in fact is meant for the surface you’re testing, as some products will only cover certain types of material. DIY kits are for architectural surfaces only. For toys or furniture, proceed directly to the ‘Testing Scope’ section below.
Consumer-grade lead test kits are engineered for architectural surfaces only. This includes wood trim, plaster walls, and ferrous metals. Using these kits on other materials can lead to dangerous inaccuracies.
Strict Liability Warning: DIY swabs are not validated for non-porous consumer goods. Chemical stabilizers in plastics or metallic glazes on ceramics can cause “chemical interference,” resulting in a false negative that could leave your family at risk.
If lead is detected, you need to follow the following steps outlined by the EPA:
- For definitive results, send paint chip samples to a laboratory recognized by the National Lead Laboratory Accreditation Program (NLLAP). These labs use strict protocols to ensure your results are legally defensible.
- Check the report created based on the professional assessment
- Determine if you can retain the paint or abatement is needed, based on the report
It is possible to retain the paint with lead in your home, but the downside to this is that regular inspection and maintenance is a must, and that any home renovation you plan to undertake must only be done by contractors who are lead-safe certified.
But if abatement, whether through complete removal or by getting the lead-based stuff sealed or enclosed, is recommended by the assessor, it must only be done by certified abatement contractors.
You and your household should also undergo a blood test to detect if you have already been exposed to lead and the level present in the bloodstream, and if any medical intervention is needed if it is detected.


